Wednesday, November 23, 2011

First Christmas Card for 2011

Hello!

How have you been?

My days were filled with Perry-love lately.  He is now 4 1/2 months and demands for more love and affection from me. Crafting is quite impossible sometimes.  But tonight, while hubby and I were watching The Walking Dead Season 2 Episode 1 and Perry was in deep slumber, I managed to create my first Christmas card for this year! Hooray! :D

Here it is...


I felt the urge to craft tonight to balance out the negative thing that happened today.  Hubby was in a car accident.  Rocks fell from the mountain on the Kalayaan (Hydro) highway while he was driving on his way home.  The right front wheel of the car was smashed.  I am sooooo thankful that he's not hurt.     

Saturday, November 19, 2011

Gamer at Heart

Unbeknownst to many some, I am a gamer. And before I play with Blythe, I used to play with boys' stuff.  This post is an attempt (because I am not sure if I can remember all)  at listing down and documenting my past hobbies that both me and my hubby (then bf) enjoyed.


RPG Games:


 - Diablo I & II - I had so much fun playing this that I didn't notice my bf smoking behind me.  Yes, I always get transported to the world I am playing. I haven't played Diablo III yet. 

 - Sims 1 2 3 - I was sooooo mad at Bella (Sims I) because my bf dated her!  But I didn't kill her. I have a girl friend who killed a character that snatched her bf's character. Funny thing was, the character she drowned was a girl character of bf's another male housemate who's only trying to make her jealous and see how she will react.  Ha ha! So many fun memories with this game in Tandang Sora. :D (click pic for the source)


Network Games:

- CounterStrike - I played this in a cafe full of male players, in bf's apartment, and even in the office during lunchtime. Yes, I played CS even after college. (click pic for the source)

- Cossacks : European Wars - This is my all-time favorite network strategy-game.  We played this in bf's apartment from dinner 'til dawn. I've had sooo many sleepless nights playing this.  Why?  Because this is a strategy and a war game.  A round of this can't be finished in minutes.  We spent hours building our army and destroying our opponent's base.  This is more fun when I was playing against 2 or more opponents. So when I was only with bf or one of bf's housemate, we include one or 2 computer player/s. (click pic for the source)

- StarCraft - Protoss was my favorite race. We also played this during lunch break in the office.  So fun!  I always win over a male friend/officemate back then. :D  I haven't played Starcraft II yet.  (click pic for the source)

- War Craft III : the Frozen Throne - Night Elf was my fave race when playing solo.  And in network games, I usually use Lich, Death Knight, and Demon Hunter for my heroes. (click pic for the source)


PS:

- Silent Hill - I just tried this game and didn't even made it past the foggy street part.  I played this game on a night that I was left alone in bf's apartment because he and his housemates went to a bar across the street.  It scared the sh*t out of me!  I was sooooo afraid that I went straight to bf's bed and hid under his blanket.  We had no cellphone back then so I had to wait for them to come back home.  I never touched this game again.  but I watched the film. (click pic for the source)

Miniature WarGame:

 - Mage Knight - This is played using tape measure and dice. Bf and I went to different places so he can join tournaments and to buy booster packs.  Opening a Booster Pack was fun and exciting.  The dragons however, were bought separately.  Too bad Wizkids stopped releasing expansions and stopped tournament support in 2005.  But we still keep the collectible figures because we can still play with it.  Wizkids has just relaunched it as a board game, card game, and RPG.
I repainted this reaper back then.  :D

Online Games:

(screenshot of my lvl 80 Undead Mage named Alikka while waiting for players in a 25-man raid)
- World of Warcraft - Oh yes! I was addicted to this online role-playing game.  I spent hundreds of dollars (thousands of pesos) playing this game.  I bought the starter pack ($50), the 1st expansion set Burning Crusade ($50), and the 2nd expansion set Wrath of the Lich King ($50).  Add to that the electricity and the internet monthly bills for 2 years.  I also bought my Acer laptop (Php 40k) for this game, so that I can play even at my bf's apartment.  2 of his housemates played this too.  I also spent many sleepless nights just to be included in a 25-man raid.  Our Filipino guild-mates were mostly call center agents so they play/raid during daytime which is impossible for us who works from 8am to 5pm. So, we had to join raids of non-guild-mates at night til dawn.   Then we transferred to another guild that plays during our playtime.  I went to work without sleep for this.  Imagine that kind of life I lived for 2 years.  So it's no wonder that I looked like my Undead character after WoW!  Below is Alikka at lvl 72. :)
I had to stop playing WoW because it has not only affected my health but also my graduate studies.  I was AWOL-ed for 2 semesters and on LOA for a sem because of this.  I was lost in this world so I really had to quit playing.  And I have to say that I still miss this world sometimes even now that I already have a baby.    

- Facebook Games like Restaurant City, Mafia Wars, Farm Town, CityVille, Sorority Life, and The Sims Social.  You can see game posts on my wall from time to time.  It is really hard to stop playing games if you are a gamer at heart.  

Looking back at all these games, makes me want to buy a Nintendo switch :)

What distractions have you got that keep you from being productive?

Tuesday, November 15, 2011

Cardmaking for Christmas 2011

I've skipped on my Weekend Baking and Wednesday Blythe because my mind has shifted towards cardmaking.  Well, I'm still at the coloring stage so i'll only be sharing pictures of the images I'm currently working on.

These images are from a dear friend.  I am having sooooo much fun coloring them because of their cuteness!


I am using Faber Castell colored pencils, yellow glitter glue (it's the only one I've got), and pink glittery gel pen.  


What holiday preparations are you starting now? We've only got 40 days left before Christmas! 

Sunday, November 13, 2011

Weekend is for the family - Perry reading his book at 4 months

I've always wanted to take our family pictures doing the things we love.  And this picture below is one of them.


This photo shoot is unplanned - no make-up, no props, no dress up.  Hubby and I just grabbed the chance that Perry was awake and playful last night, Nov 10, 2011.  I can't believe that my very tiny baby boy is now 4 months and 6 days old!

On the other news, Perry's first dresser is already too small for his little things.  So this afternoon, hubby and I bought him a new cabinet.  Good thing we left our baby to his Lola (grandma) because a funny little accident happened while we were parking at the mall plus we had to remove the backseat on the way home because our car was too small for his new cabinet.  Perry would have been very uncomfortable if he was with us.

As much as possible, I want to bring Perry wherever I go, especially during weekends.  We only get to take care of him during weeknights.  So I love weekends because I have 3 nights and 2 whole days to spend with my hubby and my baby. :D

Wednesday, November 09, 2011

Wednesday Blythe - Dresser / Drawers DIY

I made another furniture to house my Blythe's socks, pants, and other blouses.  This time, I recycled some trash and turned them into a cute dresser!  


This tutorial is a lot easier than the first one.
 

Materials:

2 Spam tin cans (If you are a healthy eater, ask your neighbors for these. I'm sure they'll save you some)
4 ballpen bottom caps 
Illustration Board
Paper Scraps 
Beads
Craft Glue
Double-sided Tape (thick)
Scissors / Cutter
Ruler
Pen
Paint/s
Brushes


Procedure:

1. Draw the above pattern on your illustration board.  Each drawer measures 3 x 3 x 1.5.  Trace the Spam tin opening too.  2.  Cut the patterns. You should have 2 of each.  3.  Cut lightly the lines on your board.  Make sure to cut only halfway through the thickness of your board.  This will enable you to fold the sides of your drawers easily. 4. Fold the sides of your drawers.

5.  Get one drawer and fold the sides.  6.  Glue a piece of scrap paper to fasten the corners.  Make sure to apply generous amount of craft glue. 7. Glue all corners of each drawers.  8. Place the drawers on top of the oval-shape side. 

 9.  With some scraps of paper, glue the 2 pieces together.  10.  Use the tip of your scissors to make sure that there is no space in between the paper scrap and the board.  Glue all sides of the drawers.  If you want, you can also glue on the inside.  Just use paper scraps of the same color as your board if you are not painting the inside of your drawers.  11. Use wooden clothespin (or paperclips) to keep the pieces in place while drying.  12.  As you dry the drawers, start working on the Spam tin cans.  You will notice that there is a gap in between the two.  We are going to fill this gap in order to attach both tins together.

13.  Place thick double-sided tapes on one of the tin cans.  The numbers 3,3,2,1 on the picture indicate the number of double-sided tapes piled up on top of one another.  14. Press the 2 tin cans together while sitting on top of your table to ensure that they are aligned with each other.  15.  Then work on with the feet.  Fill the ballpen bottom caps with craft glue and crumpled scraps of paper.  16.  Make sure to fill these up to the brim.  

17. Place a double-sided tape on the brim of the ballpen caps.  18.  Tape these caps on your Spam tin can.  These will be the feet of your dresser.  19.  Test the strength of the feet.  20.  Test the drawers on your dresser. 

21.  Paint your dresser.  I used 2 coats of acrylic paint.  Dry completely the 1st coat first before applying the 2nd coat.  22.  When the paint is completely dry, prepare your paints and beads for decoration.  23.  Glue the beads that will serve as your drawer knobs.   24.  Then glue or paint your design on your drawers! Have fun with this part! :D

Congratulations! You now have a handmade Blythe dresser! :D 

Add doilies or table runners on top of your dresser and place picture frames, flowers, and other miniatures to personalize the dresser according to your Blythe / doll's personality.  


I hope you enjoyed this tutorial. :D

Monday, November 07, 2011

Sneak Peek on What's Coming this Wednesday

Pardon me but I am just uber excited to share this!


Coming right up this Wednesday! See you! :D

Weekend Baking - Spiced Cider Whoopie Pie, 1st Attempt

I am still not over with my apple-cinnamon craving.  So when I saw this Spiced Cider Whoopie Pie Recipe by Emma from Elsie's blog, I thought I want to try it too.  

However, I think I have failed in my first attempt at baking this whoopie pie. :(  Here's how I did it and I really hope to learn from this.


Ingredients:


1/2 cup softened butter
1 cup brown sugar
1 egg
1/3 cup sour cream (i used all purpose cream with 2 calamansi extract)
1/2 teaspoon vanilla extract
2 cups flour
3/4 teaspoon baking powder
3/4 teaspoon baking soda
3/4 teaspoon salt
1/2 teaspoon cinnamon
1/4 teaspoon nutmeg
(a pinch of cloves -  i could not find my cloves so I disregarded this
2 apple (Granny Smith) peeled cored and cut into small pieces


Procedure:


1.Cream together butter and sugar
2. Add the egg, sour cream and vanilla and mix until just combined
3. In another bowl combine all the dry ingredients. Then, combine the wet and dry ingredients until there are nearly no lumps left. 
4. Stir in the apple pieces.
Can you see the consistency of my batter at the fourth picture? It was too thick. I thought that maybe there was something wrong with my batter after I stirred in the apple pieces.  But I continued anyway.
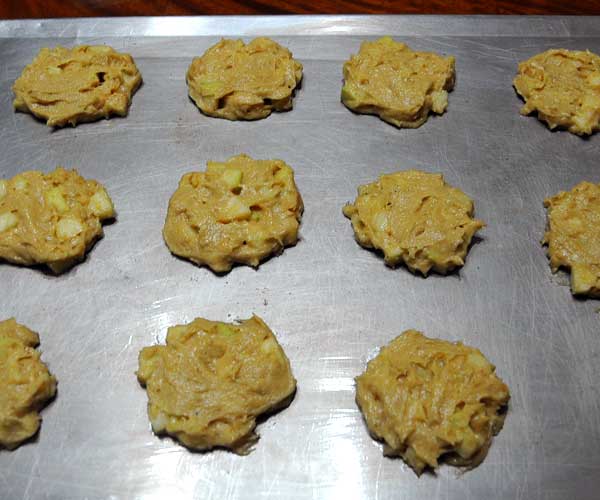
I placed spoonfuls of batter on a greased baking sheet and baked at 375 F for 15 minutes. Below is my first sheet/tray.  It has 12 pieces and they really look funny and so different from Emma's.

I wanted to see the result first before baking another tray so I waited for this to finish.  Below is the result of the first batch.  It took 15 minutes to bake this.


Below is my 2nd sheet/tray. It only has 11 pieces. I tried my best to make them smoother than the 1st batch.


And below is the result of the second batch.


For the filling... What filling!?! Well, I did not continue making the filling because the 1st batch of my "whoopie pies" was almost gone when I finished with the 2nd batch.  Dad, Mom, hubby, and my baby's nanny almost finished off the 1st batch even without the filling!

They said that there was something funny with the taste but it was delicious.  I told them to wait for the cream cheese filling but they still ate them as is.  :D  So that is why I think I failed.  My family ate these as if these were cookies! 

Where do you think have I gone wrong?  Or did I make them properly but failed to add the filling?  I am no expert baker here.  And I really want to know why my whoopie pies are so different from the pictures of my recipe source.  I'll definitely try this again some other time because Mom was already getting tired of my apple-cinnamon baked goodies.   

P.S.
Filling:
Combine 1 cup cream cheese, 2 tablespoons melted butter, a pinch of cinnamon, and 1 cup to 1 1/2 cups powdered sugar until you get the frosting consistency you prefer. :D

Sunday, November 06, 2011

Meet Mr & Mrs Pig

Hello lovelies!

I'd like you to meet Mr. and Mrs. Pig.  Aren't they cute?


They will soon go to Winnipeg.  I'll surely miss them.  Maybe I should make some more animal-themed coffee huggers for my shop, yes?

Thursday, November 03, 2011

tumblr love to give us warmth on this gloomy Thursday

The weather has been depressing since yesterday.  Being alone in the office made it even worse.  But looking at my son's pictures made me miss him more.  So I hopped on to my friend's tumblr and randomly selected one of those persons she is following.  And I feel sooo glad to find these lovely images that gave me warmth on this cold and lonely day.


via 

Can you feel some warmth now? I hope so. :D Have a lovely rainy Thursday!


Wednesday, November 02, 2011

Wednesday Blythe - Dress Rack and Hangers DIY

Hello!

We've had a very busy holiday here.  So please pardon me if I haven't shared a Weekend Baking recipe last Sunday.  I also haven't had the chance to take photos so I will not be able to share how we spent our 1st of November here.  My son was a star yesterday and he was very cooperative even if we came home late from the cemetery. It was a lovely day.  I hope you enjoyed your holiday too! :D
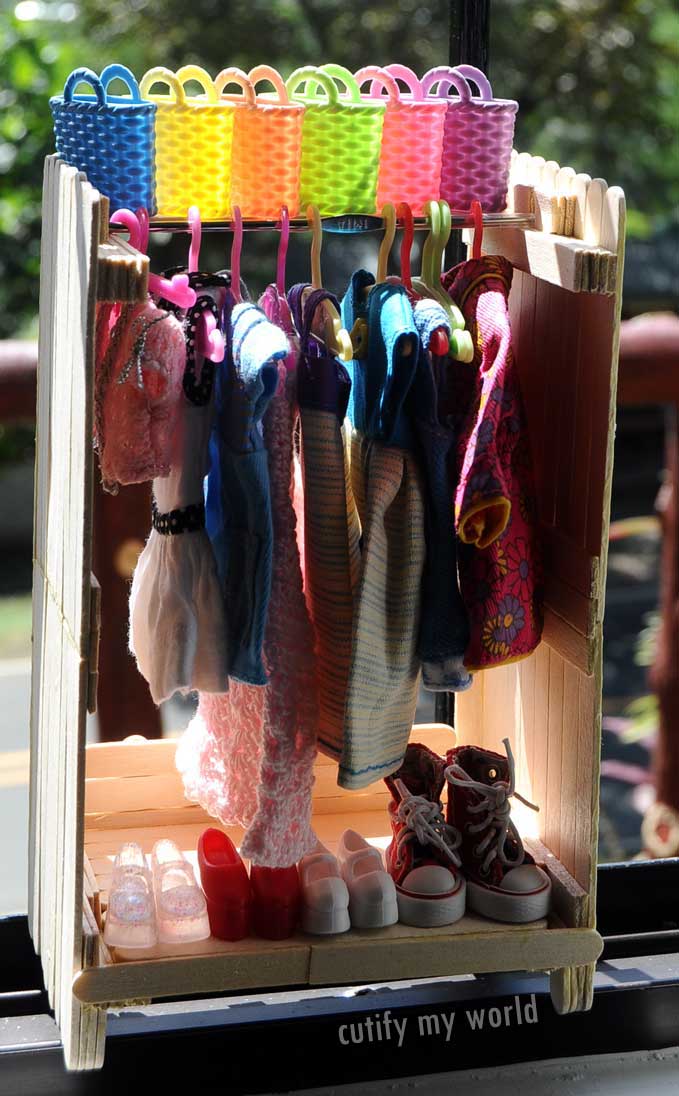
As promised, to myself, I have started making stuff for my dolls' future house. Yey! :D

I have been dreaming of having a closet for my dollies to store and display their dresses.  The available ones in the mall are mostly Barbie's and in hot pink!  I did not like the style.  So for my first Blythe furniture,  I made a simple but cute dress rack!


See the supplies and instructions on making this dress rack below.


Supplies:
popsicle sticks   
metal rod (I used a crochet hook that I no longer use) 
tacky / craft glue     
scissors   
ruler   
pen    
acrylic paint   
brushes   

1. Line and cut one end of 8 popsicle sticks like pictured above.  2. cut the ends of 2 more popsicle sticks, sized according to the width of the 8 sticks.  3. Brush enormous amount of glue on the 2 sticks.  4.  Place the sticks on both ends like pictured above to gather and put in place the other 8 sticks.  This will serve as the side of your dress rack. Make 4 of this if your sticks are the same length as mine (around 4" long).

 5-6.  Glue together 2 of the sides like pictured above.  7.  Do the same for the remaining 2.  ***This is unnecessary if you are using longer popsicle sticks (like the ones available in Starbucks).  This length is all I've got so I had to make them longer.
8. Cut 5 more sticks for each sides' top/upper part.  Glue them on top of each other.  Do the same on the sides' bottom/lower part.  9.  Gather the cut ends and sized it according to the sides' bottom/lower part.  10.  Glue and pile them up together like pictured above.  This will enable your rack to stand better. ***The reason for the piled up 5 sticks is that my crochet hook is longer than the length of the popsicle sticks.  
11. Cut squares from the sticks / cut ends.  Prepare 12 squares.  12.  Glue the squares (3 layers each) on sticks 4 and 5 on each of the sides' top/upper part.  Make sure that there is enough space in between, sized to the width/diameter of your rod.  This is where you will insert the ends of your metal rod / crochet hook.  13.  Create the rack's base and a top shelf. For the rack's base, glue together 8 popsicle sticks like pictured above.  For the top shelf, I glued together 2 1/2 sticks. 14.  This is optional.  I glued sticks on the back of each side.  15.  Place the rack's base and top shelf on their places.  These strengthen the rack and prevent it from swaying especially when the metal rod is removed.  Make sure to always brush huge amount of glue on the sticks.    Then place the rod on its proper place. 

16. Let it dry completely.  Then test the strength of your rack by hanging some dresses.  and Ta-Da!
You now have a doll's dress rack! :D     


Now paint it or glue patterned paper on it.  You can design it with whatever you like.


I painted mine light blue. soo cute, isn't it?

Here is a simple tutorial on making your own dress hangers using pipe cleaners. :D

How to make your own dress hangers:

Materials needed: pipe cleaners and cutter/scissors (optional: beads and other embellishments)

Instructions: 1. Cut pipe cleaners 2 inches long.  One hanger uses two.  2.  Wrap around the middle of a 2-inch pipe cleaner the one end of another 2-inch pipe cleaner.  3. Insert beads to make it cuter.  And you're done! So easy, right?

 Test the hangers on your dress rack.

Then fill it with dresses! 

I will be very grateful if you will share your thoughts on this by leaving a comment below.  And don't forget to include the link of your creation too when you try this.  You can also share photos in this flickr pool that I started. :D  Enjoy!