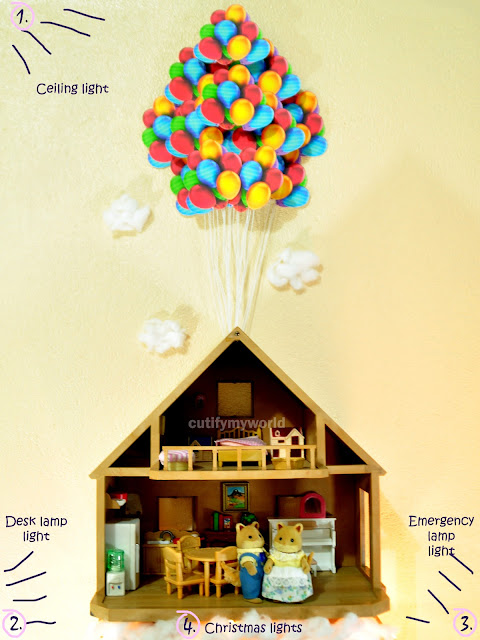
I've been thinking of ways to shoot Up using my Sylvanian Families for days. But the perfect set-up only came to me at midnight last night. It was 12 hours before the deadline and 6 hours before I have to get up from bed and prepare for work. "What will I do?," I thought. Without hesitation, I got up and started cutting balloons. I knew that sleep won't come in an hour or so because I won't stop thinking about the Sylvanians. And I knew that I will forever regret it if I didn't shoot them right away. In less than 2 hours and with only 4 camera clicks, I got my 3rd and last entry to the PH{heart}SF "Love at the Movies" Photo Contest. I emailed it right away so I won't have to worry about it this morning. Here's the photo...
I loved it!
This time, I'll be sharing how I photographed my entries.
Lighting played the biggest part in all of my 3 entries. Since, I am shooting at night and inside the comfort of our home, I made sure to use both cold and warm lights to get the effect I wanted.
Cold lights = fluorescent lamps, reading/desk lamps/ emergency lamps, or any other "white" lights
Warm lights = Christmas lights (yellow), incandescent bulbs, or any other "yellowish" lights
As you can see from the illustration below, I used 4 light sources for the set-up. 1. Ceiling "cool" light, 2. Desk/reading lamp "cool" light, 3. Emergency lamp "cool" light, and 4. "warm" Christmas lights covered with cotton.
You can also see the position of the light sources from the illustration. The ceiling light is slightly on the left-front side of the set-up. Lights 2 & 3 are both below and very slightly on the front side of each sides of the set-up. And my only "warm" light is directly under the set-up. The problem with shooting at night is the appearance of shadows that's why I had to use lots of light sources. If you have a photo studio, then you need not worry about this of course. In my case, I don't so I had to make do with what I have.
Notice that only one light source was above the set-up. This was because I do not want to give much emphasis on the balloons because first, they're just made of paper; and second, the Sylvanian Family house and creatures are the focal point of this photo.
For the Upside Down, I only used 2 light sources because the movie, if you haven't watched it yet, always has that cloudy sky with light and darkness almost always fighting in between both worlds. Did you get what I mean? I am not good with words so just watch the movie and see for yourself. :-) Anyway, the first light source was the marbled lamp with a white bulb located at the back of the scene/set up. It was hidden behind a white cloth with lots of cotton to create the sky effect. The second source on the other hand was scattered on the floor area of the set-up. Only the lights coming from the second source provided the lighting for the faces of Mr. & Mrs. Fox which gave the photo a more realistic appeal. Putting a harsh cold light source in front of the set-up will negate the nice effect on the background.
Of the three entries, shooting Up was the easiest. I had to set up Moulin Rouge more than 3 times probably because it was my first and also because I couldn't seem to find the perfect elements for it, except for the clouds and the elephant. As for the Upside Down, hubby and I had to try probably a dozen or so lighting set up before we finally got that picture. This whole "Sweding" thng wasn't easy but it sure was FUN!
I am not a professional photographer and I didn't go to Fine Arts school, so the tips I shared above are based purely on personal experience and experiments. If you'd like to add more tips on lighting techniques in photography or correct some of the techniques I did, please feel free to do so. I would really love to hear more ideas and constructive criticisms. :-D


No comments:
Post a Comment