Tuesday, September 07, 2021

Weekend Sewing - Blythe Dress and Panties

Hello lovelies!

Yesterday, I was able to do some sewing for the dolls. I ordered three factory Blythe last week for my nieces - Summer, Snow and Aila. And knowing that these dolls will arrive naked, I thought of sewing some clothes for them. Also, my cousin, Hazel, has been bugging me to sew some panties for her dolls too. So I started yesterday with the undies.

I watched a tutorial in YouTube on a very easy and simple panty pattern. Just trace the stock panty on a cardboard or paper and you will have a pattern. It was not that simple though. I did it then sew one panty based on the pattern and it turned out big. So I made some adjustments just to see how it will fit. And as I adjusted the panty, I adjusted my pattern too. Then I made another one and it fits perfectly. I made 5 with gray cloth aside from the prototype.

That panty was easy because you just need to sew the sides to connect the front and back. No sewing was necessary for the waist or leg holes. Undies of some recently released Blythe dolls are just like that. Just find a stretchable cloth, cut the pattern and sew the sides. So simple and easy. The cloth I used for the panties is from a real panty. It is new of course. Before the pandemic, whenever I go to the market, I look for cute panties with dainty designs. I have collected about 10 panties with stripes and little flowers on them. The colors are lovely too.


The gray panty I used yesterday has already been cut. I cant remember what I did with it. Probably a pair of long socks that I cannot find anymore! Lol. So I just used the remaining cloth for my prototype. Aside from the 6 panties, I was able to cut 2 more pairs of socks (one short and one long) from the remaining cloth. I will post a tutorial and share the patterns on my next post.


After the undies, I made a simple dress based on the pattern I got from the tutorial video of Creative 404 in YouTube. It was perfect for a stock Blythe body and for a Momoko doll although a bit short. But it is a little tight on top for an obitsu body with a bit of a bust. I might have to make some adjustments with that.
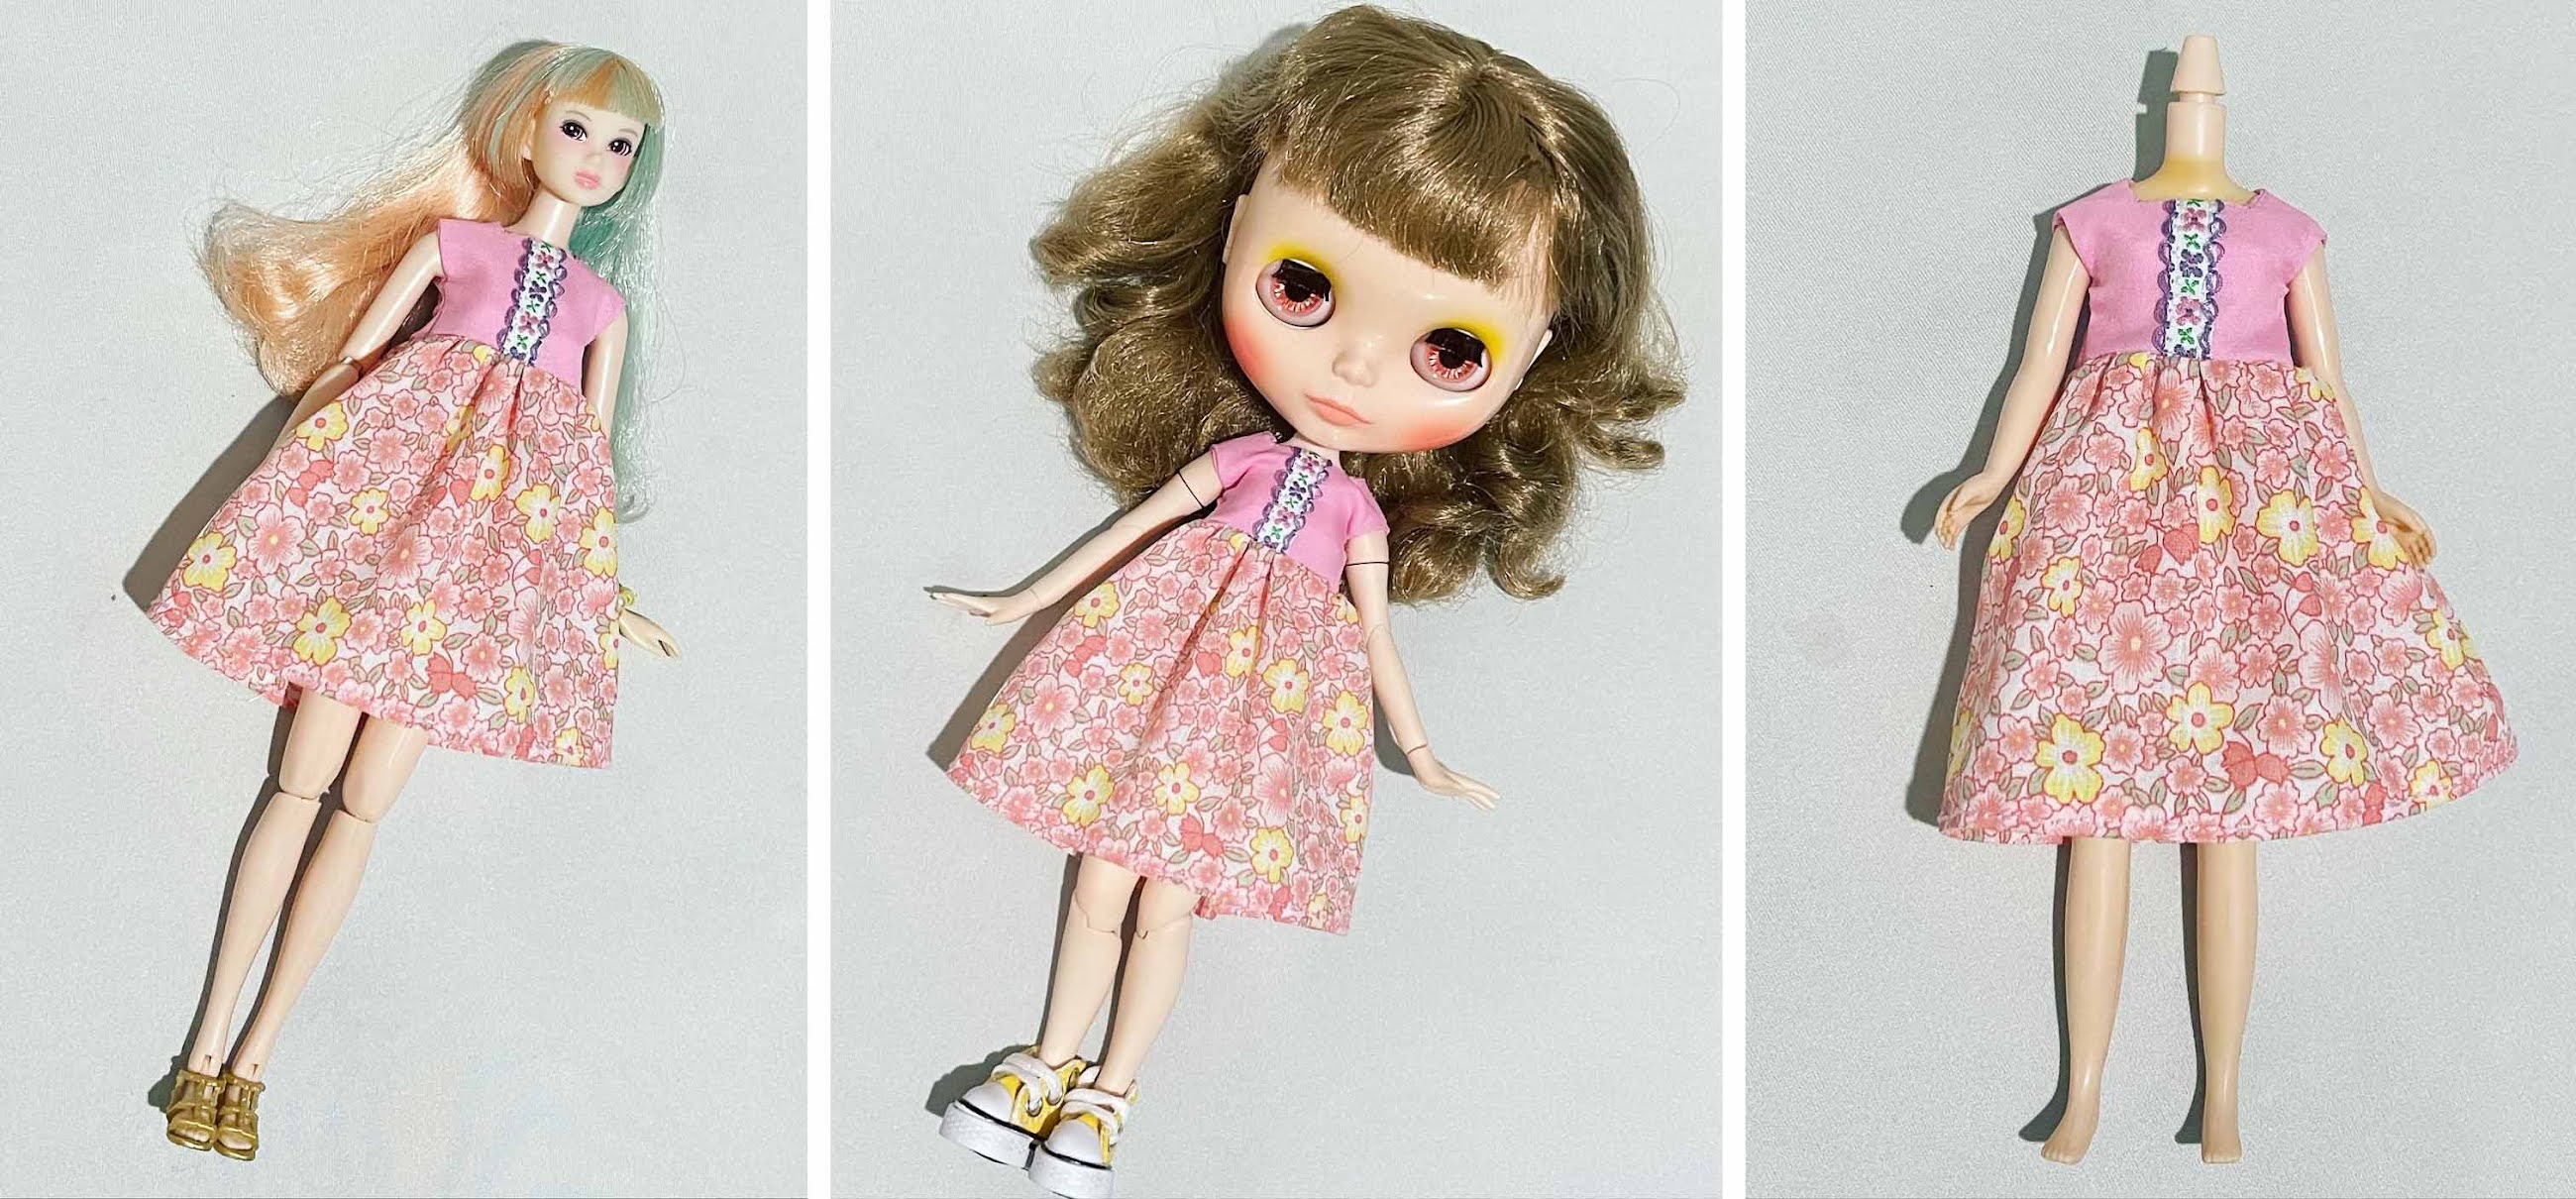

I am quite happy with what I have accomplished yesterday. What creative endeavor did you do last weekend? Share it with me in the comment section below. :)

XOXO,
Ails

Friday, August 20, 2021

Baking Banana Bread Using an Air Fryer

Hello lovelies!

I missed baking. The last time I baked was almost a decade ago, when Perry was still 1 or 2. Now he's 10! 

I have been watching a lot of YouTube videos on what bread to bake in my air fryer because we do not have an oven yet. I wanted to bake because there were times when I do not have anything to eat for snacks given my current situation (diet and lifestyle change; bitter taste due to chemo). I saw lots of recipes for sourdough, pan de sal, dinner rolls and pizza. But today, I decided to bake a banana bread that I watched from Pro Home Cooks. Having fruits in your snacks is always good.


I asked Lincoln to help me. He turned 5 years old last July and our fun and creative activities together have not been documented here as much as with my eldest. For years, I was preoccupied with other stuff and forgot how this hobby - blogging, together with arts and crafts and baking - makes me happy. 

I prepared all the ingredients first before I asked Lincoln to join me. It's my first time baking without an oven so I prayed for our activity to be successful. 


Lincoln wanted to do everything on his own. The only time he asked for my help was with the bananas. He said it was tiring. Hahaha We only used spoon and fork to mash it. 


The baking pan I used was a round ceramic dish that can fit in my air fryer. When we put the batter there, it was almost full to the brim. There was just half of an inch allowance. I got a bit worried that the bread might overflow. I was not sure if it will happen. So I decided to transfer some batter in 3 ramekins. 


Aside from that, I had to experiment with the temperature and length of baking time using my air fryer. I decided to try 150C for 25 minutes. After 25 minutes, I wasn't sure if the inside and bottom of the bread were done, I decided to add 5 more minutes of baking time. Then after that, I increased the temperature to 200C for 2 minutes because I wanted a crisp crust. 


And luckily, we succeeded! The bread was cooked, It has a crust that I love. The moisture is just right. And according to the boys, it was yummy! I could not tell because there is still that bitter taste in my mouth from my therapy 6 days ago. But based on how they ate the bread, I believe them! 


So here's how we did it. 

BANANA BREAD 

Ingredients: 
- 3 medium ripe bananas 
- 1/3 cup olive oil 
- 1/3 cup honey 
- 2 eggs - 1/4 cup milk 
- 1 1/2 cups all purpose flour 
- 1/4 cup instant oats 
- 1 tsp baking soda 
- 1 tsp cinnamon powder 
- 1 1/2 tbsps almonds chopped 
- 1 1/2 tbsps walnuts chopped 

Process: 
1. Mash the bananas in a bowl. Mix all the wet ingredients together with the bananas. 
2. Sift the flour, baking soda and cinnamon in a separate bowl. Add the oats. Mix thoroughly. 
3. Add the wet ingredients to the dry ingredients. 
4. Add the nuts (almond and walnuts) and mix thoroughly. 
5. Pre-heat the airfryer at 150C for 5 minutes. 
6. Pour the batter into the baking pan/dish. 
7. Bake at 150C for 30 minutes. (The ones in the ramekins were done in about 10 minutes.) 
8. Remove from air fryer and let it cool down a bit before removing the bread from the baking pan/dish. 
9. Serve and enjoy!

You can incorporate chocolate chips or raisins instead of nuts or all of them altogether. If you try this recipe, please tell me how it turned out. :)

xoxo,
Ails

Thursday, March 12, 2020

DIY Miniature Coffee Shop

Hello lovelies!

How have you been in a year? Did you miss me? 😊 Coz I missed you!

Let us make this comeback exciting by sharing with you a DIY miniature project that i finished the other night. I bought this from Lazada last June but i only had a few hours in 3 nights last year assembling its little details.    


A ninja delivered it to me safely after weeks of waiting. I was so happy when I received this because the first time I ordered, the shop sent a wrong item. They refunded my money but imagine the frustrations I've been through before I finally have this.

When I opened the box, i saw that the items are packed separately. Each ziplock bags are labeled with letters so that you will know what it is for based on the instruction book. The box contains scissors, a ruler, a cutter, tweezers, craft glue and super glue.  The shop description said that it has no dust (acrylic) cover and no musical box. So, this cafe only has lighting fixtures. My son would probably love it more if it plays music.


That night, I started working on the display shelves. Oh it was so fun! My heart was full as I went to sleep. 

Then I got so busy with work so I set it aside. After a month, I was able to squeezed it in my schedule one evening and worked on the table and chairs.


I was not able to take photos or videos of each item in the set. But here is the last picture of what I accomplished last year. These are the menu boards and some more pastries.

Then, the other night, I felt the urge to finish my miniature cafe. The assembly was really easy except for the light fixtures that I will explain later. The picture below shows how I did the tulips. These flowers are so fun to make. I didn't know before that these little wooden beads would pass as tulips when used with wires and green crepe paper!


The cafe has 4 lights. There are 2 inside for the ceiling, 1 at the round signage and 1 under the umbrella. The first 3 are easy to put in place. My problem was the one under the umbrella. First reason is that the instruction book did not say how the wiring will connect to the switch. Second is that the wires of the 4 lights are equal in length but the one under the umbrella is the farthest and requires longer lines. So before I put the walls in place, I put the lights in their proper places and check where the lines/wiring will pass through. The pictures below will show how I did it. 


However, it is still too short that I had difficulty attaching it to the switch. If you are going to make this, you should have an extra set of wires to make it longer. You should also plan ahead where you would let the wires pass so it will not be as visible as mine.

Also, try the lights if it is working as soon as you open the box and once again before installation. I did not try mine even before installation.  When all are set and glued, I turned on the lights and it did not work. 😞 My dear husband will get a new set of batteries for this so I am still hopeful! 

Here are some more close up pictures of my miniature cafe.

I ❤❤❤ this cake display and flower pots! 

I ❤❤❤ the coffee maker! 

 Pretty neat sandwich bar!

Here is the side view of the cafe. 

And a close up photo of that. 

 And this is the side where the switch is (and where the music box should be!).

This is the top view.

A close up image of the umbrella table. 

I hope you enjoyed the trip to my mini cafe. Let's have coffee! 😊❤

xoxo,
Ails

Monday, March 18, 2019

Playing with Air Dry Clay

Hello lovelies!

Last Christmas, Santa gave my sons this cute kitchen play set that Perry has requested. The play set is not just for play cooking. It has tubs of clay and some molds to encourage the child to play with clay and develop creativity. Now that those tubs of clay were gone, I bought an air dry clay from the market. I had the chance of knowing this type of clay when I looked for some party loots for Perry's 7th birthday. The clay used to be in small tubs but when i came back to buy again this year, it was just packaged in resealable plastic bags. It is very cheap but it is perfect when making toys or miniatures from clay. No baking is needed.

Last night, I decided to play with the air dry clay and the kitchen set. Ivy joined me and we created a lot of food stuff for Lincoln to play with!


I started making sunny side up because my son like it and he always use that mold when playing.

Then Ivy made an apple. It's the biggest one in the picture. I made the rest. There's no mold for that so we sculpt it ourselves.

I also made bananas without any mold while Ivy was making carrots.


Aside from those, I made fried chicken legs and Ivy made lettuce and colorful seafood (crabs, lobsters, fishes, and shells).


We had fun playing with clay but our joy was doubled when we see how much Lincoln enjoyed our creation in the morning. 

The clay dries up fast. It is still soft when dry but it retains its shape even if you press it. But it can be torn apart or gets easily destroyed if you intend to. It is not like the baked clay which turns hard and plastic-like. But still, I want to create more miniature stuff from it for my dolls soon. Also, I will try painting some of what we made to see how it will react to acrylic paint.


How about you? How did you enjoy your weekend? :)


Friday, March 15, 2019

Laguna's Anilag Festival 2019

Hello lovelies!

Our province of Laguna recently celebrated its annual Anilag Festival last March 2-9, 2019. Anilag is from the words "Ani ng Laguna" if I am not mistaken. It showcased the products and landmarks of all the towns in Laguna. It also celebrates the talents and skills of its people.

I went there after office hours on March 6, 2019 with my dear husband, my Lincoln, and Ivy. Perry had a fever that afternoon. I wanted to cancel our date but Lincoln was crying "Go! Go!" He can already understand what we were saying or planning to do. So we pushed through with our plan and left Perry and Lola Linda at home.

The first thing we saw when we enter the Provincial Capitol grounds were the landscapes and plants of various organizations. I like this Bonsai Village so much! I dream of having some Bonsai plants in my garden. 

We also enjoyed visiting the town booths. I admire the artistry and craftsmanship of  the people behind the booths. I have limited pictures taken but I will share it here.

Paete, Laguna is known for its wood carvings and paper mache products. Lincoln got 1 of these paper mache horses that i also enjoyed when I was a kid.

Siniloan, Laguna featured a painting of its famous Buruwisan Falls. It is my home town and I have been to the falls 3 times when I was young. I will share about it more next time.

Famy, Laguna featured their famous 'salakot' or wide-brimmed hat. They also have this cute bamboo miniature house! I love it! If I could only buy that for my dolls. haha

Mabitac, Laguna featured their church. I really admire how they use the coconut shells and other natural materials in designing their booth.

Victoria, Laguna featured their famous 'itik' or duck. We bought fried itik and salted egg as pasalubong from there. Yummy! We also found my dear friend and Lincoln's Godmother, Dulce there. 

San Pablo City made this realistic giant fish on the other hand probably to represent their seven lakes. 

Magdalena, Laguna also showcased their church. Lincoln wanted to climbed all the stairs he could find! Even with the small house in Famy! 

Lumban, Laguna is known for embroidery and piña fabric used in most Barong Tagalog and other formal wear.

 We also found this house made of recycled plastic bottles. It's cute but I can't remember the town it was from.

We left early after eating dinner there because we want to go back to Perry and check on his condition. We did not see any activity while we were there. My brother's family went on the last night of the festival and they said that it was so full of people. There were live bands playing. The schedule of the festival was available here and here and more photos here. I hope next year, I will be able to share with you all our towns and more. 

xo, Ails